In biological wastewater treatment systems, sludge seeding and microbial cultivation are critical steps when starting a new system or restarting one after shutdown.
Correct seeding methods can quickly activate microorganisms, shorten commissioning time, and prevent start-up failure.
This article explains operation steps and common problems from two aspects, helping engineers carry out sludge seeding in a scientific and effective way.
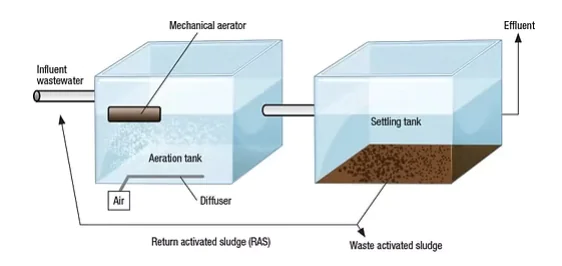
I. Sludge Seeding Process and Key Steps
1. Choose the Right Sludge Source
Select thickened activated sludge from nearby municipal plants or similar industrial wastewater systems.
Such sludge adapts faster and matches the influent characteristics better.
2. Keep the Sludge Fresh
Avoid long storage time.
If sludge stays without oxygen or nutrients for too long, microbial activity drops sharply, increasing the risk of seeding failure.
3. Perform Microscopic Inspection Before Seeding
Check sludge condition under a microscope to identify:
- Excessive filamentous bacteria
- Low microbial activity
If sludge quality is poor, do not use it to avoid system instability or collapse.
4. Control the Sludge Dosing Ratio
For thickened sludge, the recommended seeding amount is 5%–10% of the tank volume.
Adjust the ratio based on system size, influent quality, and start-up targets.
5. Activate Microorganisms with “Closed Aeration”
After seeding, maintain aeration for 1–2 days to activate microorganisms.
Ensure sufficient dissolved oxygen but avoid excessive aeration, which may break sludge flocs and reduce settling performance.
6. Add Nutrients During Activation
During early activation, influent load is usually low.
Supplement carbon, nitrogen, and phosphorus properly to maintain a balanced C/N/P ratio and support microbial growth.
7. Increase Influent Load Step by Step
After activation, gradually restore influent flow and load.
Avoid sudden full-load inflow to prevent shock and ensure a smooth transition to stable operation.
II. Six Common Problems During Sludge Seeding and Cultivation
1. Sludge Concentration Does Not Increase
Possible causes include:
- Poor sludge quality or inactive microorganisms
- No microscopic inspection before use
- Sludge stored too long with nutrient loss
- Lack of proper activation or nutrient supplementation
2. Excessive Aeration Causes Sludge Breakup
Long-term strong aeration may:
- Destroy floc structure
- Reduce sludge settling ability
Use staged or intermittent aeration to protect sludge structure.
3. Nitrogen and Phosphorus Deficiency
If the C/N/P ratio is unbalanced, microbial growth slows down.
When influent COD is low, external nitrogen and phosphorus sources must be added.
4. Insufficient Organic Substrate
If influent organic concentration is too low and no supplement is provided, microorganisms lack food.
This leads to low activity and slow sludge growth.
5. Improper pH and Temperature
- Maintain pH between 6.5–8.0
- Low temperature slows microbial growth, especially in winter
- In summer, higher temperatures accelerate microbial activity
6. Toxic Substances in Influent
Heavy metals or toxic organic compounds can inhibit newly seeded microorganisms.
In severe cases, the entire cultivation process may stop.

Conclusion: Scientific Seeding Ensures Stable Operation
Sludge seeding is a critical step for wastewater treatment system start-up and recovery.
Scientific operation can significantly shorten debugging time and improve long-term stability.
When problems occur, engineers should adjust seeding strategy based on influent quality, system condition, and organic load.
Timely optimization ensures successful microbial cultivation and reliable system performance.